Go to this website for a chance to win a Cameo! Tell her Scraptastic Ideas sent you! Good Luck!
http://www.pinkbydesignstore.com/Cameo-Giveaway-Win-a-Silhouette-Cameo-no-purchase-necessary.html
Thursday, May 31, 2012
Friday, January 21, 2011
Valentine's Day Canvas Blocks
WOW!
This project was quite the undertaking... I really enjoyed making it, but sheesh, it was a lot of work! I got my inspiration from Suzanne Surgi's blog, when I saw these blocks I immediately went out and bought supplies to make them. She got her inspiration from My Minds Eye's newsletter.
Make sure you start following both!


I wanted them to be different but still be tied together- hmmm, did that make sense?
I decided to use the paper from the Bo Bunny "Crazy Love" Collection. Since the canvas blocks are 4x4, I just bought the 6x6 paperpack and the sticker sheet.
I bought acrylic paint and painted the tops and sides of the blocks. Then while the second coat was wet, I put a heavy dusting of Martha Stewart's fine glitter on the top.
Then my creative juices started to flow to come up with each block.
I did try to do a cut from my Cricut/ Gypsy combo on every block. I mainly used the Sweethearts and Birthday Bash cartridges for the cuts.

This is my favorite one! I just love everything about it. The feathers add a lot of dimension and I love the way the flowers turned out when I spritzed them with "Iridescent Pearl Mist" from Maya Road. I cut the banner out using Birthday Bash and strung it with some baker's twine.

All of the glittery hearts are Recollections from Micheal's
and the great thing is that the 2 packages were inexpensive.
The silver heart charm is from the jewelry clearance section (bargain!). It is hard to tell how much dimension this one has. I used so many pop dots, it's just hard to tell in the picture.

Isn't the rhinestone heart gorgeous!?!? It's Martha Stewart. For the ribbon, I made individual loops and glued them individually to the canvas block, and then tied the knot and glued it- simple idea that I actually got from another one of Suzanne's creations.

I do really like this block, too! Aimee, my scrappin' buddy over at Scrappin' With the Princess, gave me the queen card. So I inked it with Tim Holtz distress ink, and- wow- what a difference! I recently got into stamping and Copics, so the 'love' is stamped and colored in my new Copics!

I LOVED these pink flowers! They are metal (cool), and made by Making Memories. Do you see the glitter on the top?? It is so pretty in person!
I really wish you could see the dimension on each block, but the pictures aren't doing them justice- bummer! I hope you enjoy this project, and Happy Valentine's Day!!!

I am going to display these in my living room and hopefully we can enjoy these for a few years.
Happy Scrappin' and Cricuting and Crafting!!!
--Ash
Thursday, January 13, 2011
Jinger's Card Challenge
Hey Everyone!
News through the grapevine is that Provo Craft is releasing a new product- Yudu Cardshop. It can screen print cards and so forth. Jinger will be doing the launch on HSN January 20th.
So, Jinger had a contest for all Cricut lovers. The contest is to create a card using either the Don Juan, Winter Lace, and or Wall Decor, and incorporate a product from Anna Griffin. I decided to participate, only because I love a good challenge.
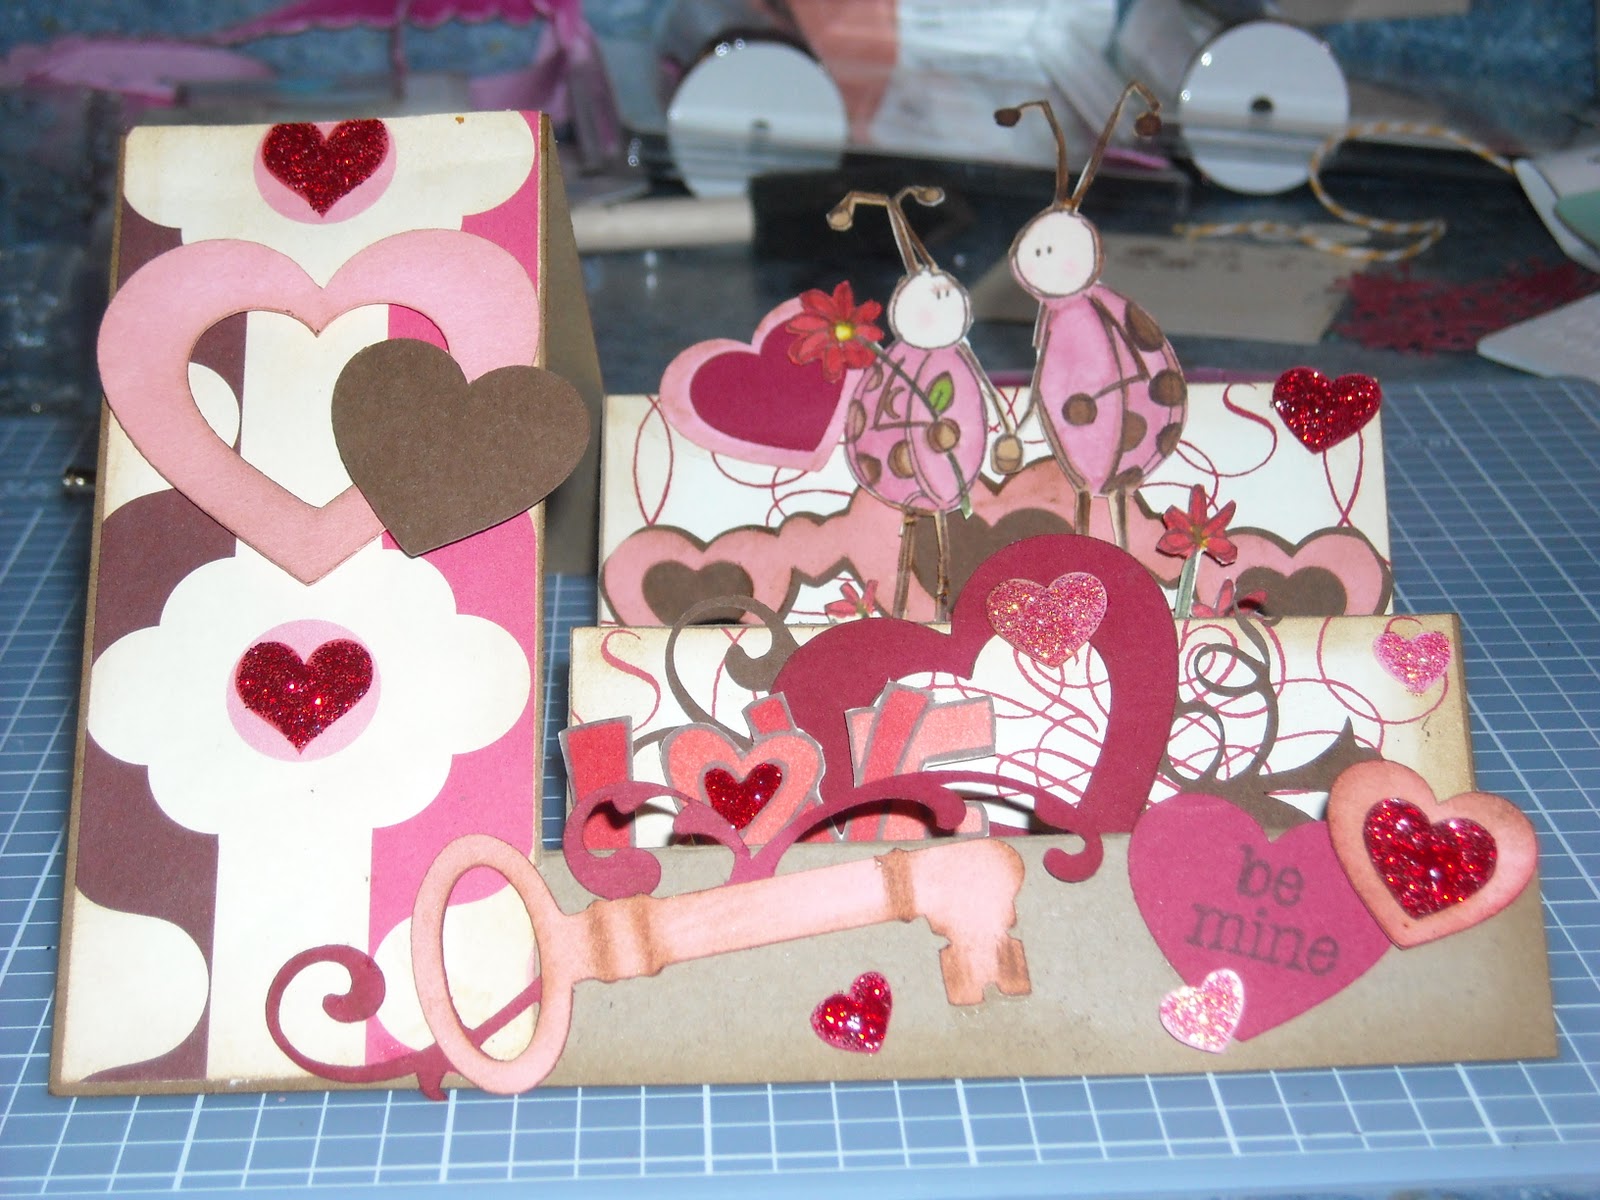
I used the Wall Decor cartridge to cut out all of the heart shapes and the key, and two pieces of paper from the Anna Griffin Valentino collection. Of course I had to do a step card, becaue I LOVE these cards, I think they are very unique!


Happy Scrappin'!!!
--Ash
News through the grapevine is that Provo Craft is releasing a new product- Yudu Cardshop. It can screen print cards and so forth. Jinger will be doing the launch on HSN January 20th.
So, Jinger had a contest for all Cricut lovers. The contest is to create a card using either the Don Juan, Winter Lace, and or Wall Decor, and incorporate a product from Anna Griffin. I decided to participate, only because I love a good challenge.
I used the Wall Decor cartridge to cut out all of the heart shapes and the key, and two pieces of paper from the Anna Griffin Valentino collection. Of course I had to do a step card, becaue I LOVE these cards, I think they are very unique!

I also used some valentine stamps- the cute love bugs, the 'love' phrase and 'be mine' phrase. I used pop dots on the love bugs to give it some deminsion. I used my NEW Copic markers to color in the bugs and the love phrase. I sure do have a lot to learn with those things...

This is the inside of the card. I found this little bug stamp and had to use it- isn't he too cute!


These last two pictures are just closer up to show some of the details. I'm so sorry about the blurry-ness, I REALLY need to invest in a new camera (I'm kinda embarresed).
One final look! Oh- and if I win the challenge, if Jinger and her team pick me, I win the new Yudu product and the new Anna Griffin prodct!!! Wish me luck and thanks for lookin'!Happy Scrappin'!!!
--Ash
Monday, January 10, 2011
An Awesome Giveaway- on another blog
Hey everyone!
I just found a new blog, and she is doing an awesome giveaway. Head on over to Sweet Manolia Rose for a chance at winning an expression and 3 cartridges!

Here's what she is giving away!
Sunday, January 9, 2011
Exciting News!!!!
I am so excited that I get to go to the Dallas Cricut Swarm!!! YAY!!! The event is March 18-20 in Frisco, about 20-25 minutes from my house. I am so excited! On the circle forum, people from the area are going to meet up and sit together for the weekend. This will be nice, so I can meet some local scrappers. I hope to start going to crops again.
One thing that everyone does is make a 3x3 "calling card" to hand out to everyone there. I am already obsessing over this! I plan on making 100 to pass out and use for the door prize drawings. I've been trying to come up with an idea, but I have to remember, I need to make 100 of these so I can't over do them like I do my other projects. Stay tuned for my calling card plan...
If you are getting to go, please let me know! Here is a link to the event if you would like more information.
http://creativecritterzevents.homestead.com/tx-cricut-stampede.html
Happy cricuting!
--Ash
A Thank You Card!
Some people who know me, know that I have a small obsession with penguins! If it wasn't 100+ here in Texas, I might consider getting one... ya, I wish! But since I can't have a real one, the next best thing is a penguin shaped card that had an itunes gift card in it. What a great gift for me!! One of my co-workers gave that to me as a Christmas present, but I didn't get it until I went back to work after the holidays.
I found a new card that I have been wanting to make,
so I made my co-worker this thank you card.

The paper is a pack of Recollections, from Michael's.
I used the Create a Critter cartridge for my penguins- only my favorite cartridge!
I have been using my Gypsy for all of the cutting, so I apologize for not knowing the size of them.
Can you believe that this was my first time to ever sew, much less thread a needle?? Yep, that's right, I've never learned to sew, but I did sew on these buttons. I think I'm a natural!
I also used yellow bakers twine from The Twinery. I love this stuff so much!
I cut the red rectangles and used my cuttlebug to emboss them. They added just enough.
Of course I had to put a little bit of bling on it, so I used some stickles in Christmas red on the penguins scarf. I also used wobbly eyes.

This is the inside of the card. I cut out a bigger penguin and then added some swirlies using a stamp from Stamps by Judith. I LOVE her stamps! I also embossed the red pieces on the inside of the card and then used some orange ribbon.

Here is a close up of the swirl stamps and my cute penguin!
(Sorry for the blurry pictures, but my camera isn't very good)

Here is how to create this kind of card:
Cut a piece of paper 4 1/2" inches by 11".
Score across at 3" and 8".
It will overlap a bit.
Pretty simple!!!
Thanks for looking and happy scrappin'!
--Ash
Monday, December 13, 2010
Altered Letters for Christmas Presents
Happy Monday!!!!
Well, the good news that it is the end of Monday! I am really excited about this week because I have Christmas parties galore, I'm even hosting one at my house for some of the fire department guys and their significant others. It should be a lot of fun, but I am have to cook and to be honest, I'm not a good cook. Actually, I don't cook at all! It's a good thing some some of my girlfriends are coming to help- thanks Ashley, Meredith and Lauren- without y'all, I might burn my house down, and that wouldn't be easy to explain being married to a firefighter...
Anyway, I wanted to share this really fun and great Christmas gift. I made these altered letters for my girlfriends at work. We always say, every year, that we will not exchange gifts, but sometimes my creative juices get the best of me and I end up making things like these for them!

The letters stand for their last names and I tried to make each letter fit their personality.
Here's a close up of each letter.


Here is a quick run down on how I make my altered letters:
I start by tracing the letter. My trick to this is to use the back side of the paper with the letter backwards for tracing. This way the markings are on the back side of the paper and you don't have to worry about seeing it. Then I cut out the letter right on the inside of the line, although that is really hard to do. The great thing about these, is that it's ok that it's not perfect!
I paint the edge of the letters and then ink the edge of the paper, usually in the same color, however, the edge of the 'S' is painted blue and I inked the paper white and it turned out just fine.
I put on a thick coat of mod podge on the actual letter and then a thick coat of it after I put the paper down. After this dries (usually let it dry overnight), my creative juices have to really kick in, and sometimes it will take me a day or so to think about how I want to decorate the letter. I have been working on these letter for about 2 weeks, only because I needed to think about how I wanted to decorate them... and of course my other projects were starring at me to finish them, too.
If you notice the 'D' is different, that's because I tore paper into small pieces and dipped them into the mod podge and applied them one by one. Yes, it took a long time and it was REALLY messy, but I got the effect I was going for. Aimee will really appreciate my work on her letter, she is one of my scraptastic sidekicks! Here's a link to her blog. Check it out and tell her I sent you! : )
I hope the girls at work love their new letters! I've only made one other altered letter and it didn't turn out near this cute, so I'm not posting it! : )

One final look. This picture was taken on my table cloth- HA!
Thanks for stopping by and I hope your week is full of Christmas surprises!
--Ash
Subscribe to:
Posts (Atom)